Pages

Thursday, December 9, 2010

Frames Made Easy...Really Easy...

I was searching blog after blog the other day looking for an easy, adorable, affordable Christmas present.   I usually only give gifts to my children, but this year since I've become a do it yourself-er, I decided I would like to make a few gifts.  That's when I cam across Shanty2Chic's blog, and found these picture frames, and I knew even I could make these.  Thanks for the great idea Whitney and Ashley!


I bought the clips at Walmart, just like the Sisters.  The base which is an oval piece of wood and a wooden candle stick, I bought at Hobby Lobby, again I pretty sure I bought all of my supplies at the same stores as Whitney and Ashley.  I did not use 2x8 cut 10 inches long, I opted for 2x6 cut 8 inches long.  I wanted something a little smaller, but I think next time I will go bigger.


Here is a picture of the top section, with the clip and applique glued in place. 

This is the oval piece and candle stick glued together to make the base.

 Here they are attached to each other.  I also made them vertical and horizontal. 


 This the glue I used, and I don't think I will use it next time.  I know the Girls used it, but it takes a while to set up and smells awful.  I might use something of the Gorilla variety next time.


 I bought quite a few different colors of spray paint, I HEART spray paint.  Especially Rustoleum, don't get me wrong I like Krylon too, but it really doesn't cover as well.  I found with this project I will have to prime the frames that I want to paint ivory.  I didn't prime the walnut or red ones, and it only took two good coats to cover.

Love the walnut brown ones, these are all MINE!  (okay so they aren't all gifts!  I had to keep a couple for me?)

These colonial red ones are for the best Mom in the World!  Yep, mine! 

I didn't distress mine, but you can if you want.  I just love how the Santa picture looks in this frame. 
I have two more in the garage primed and ready for paint, yep Krylon Ivory!
If you guys make some send me a picture please, I would love to see what size/colors you choose.
Happy Crafting!

I'll be linking up with the following:

Tuesday, December 7, 2010

Simply Christmas...

I recently was a guest blogger on Designer Garden if you missed it, here's what I did for her Twelve Days of Christmas Blog.


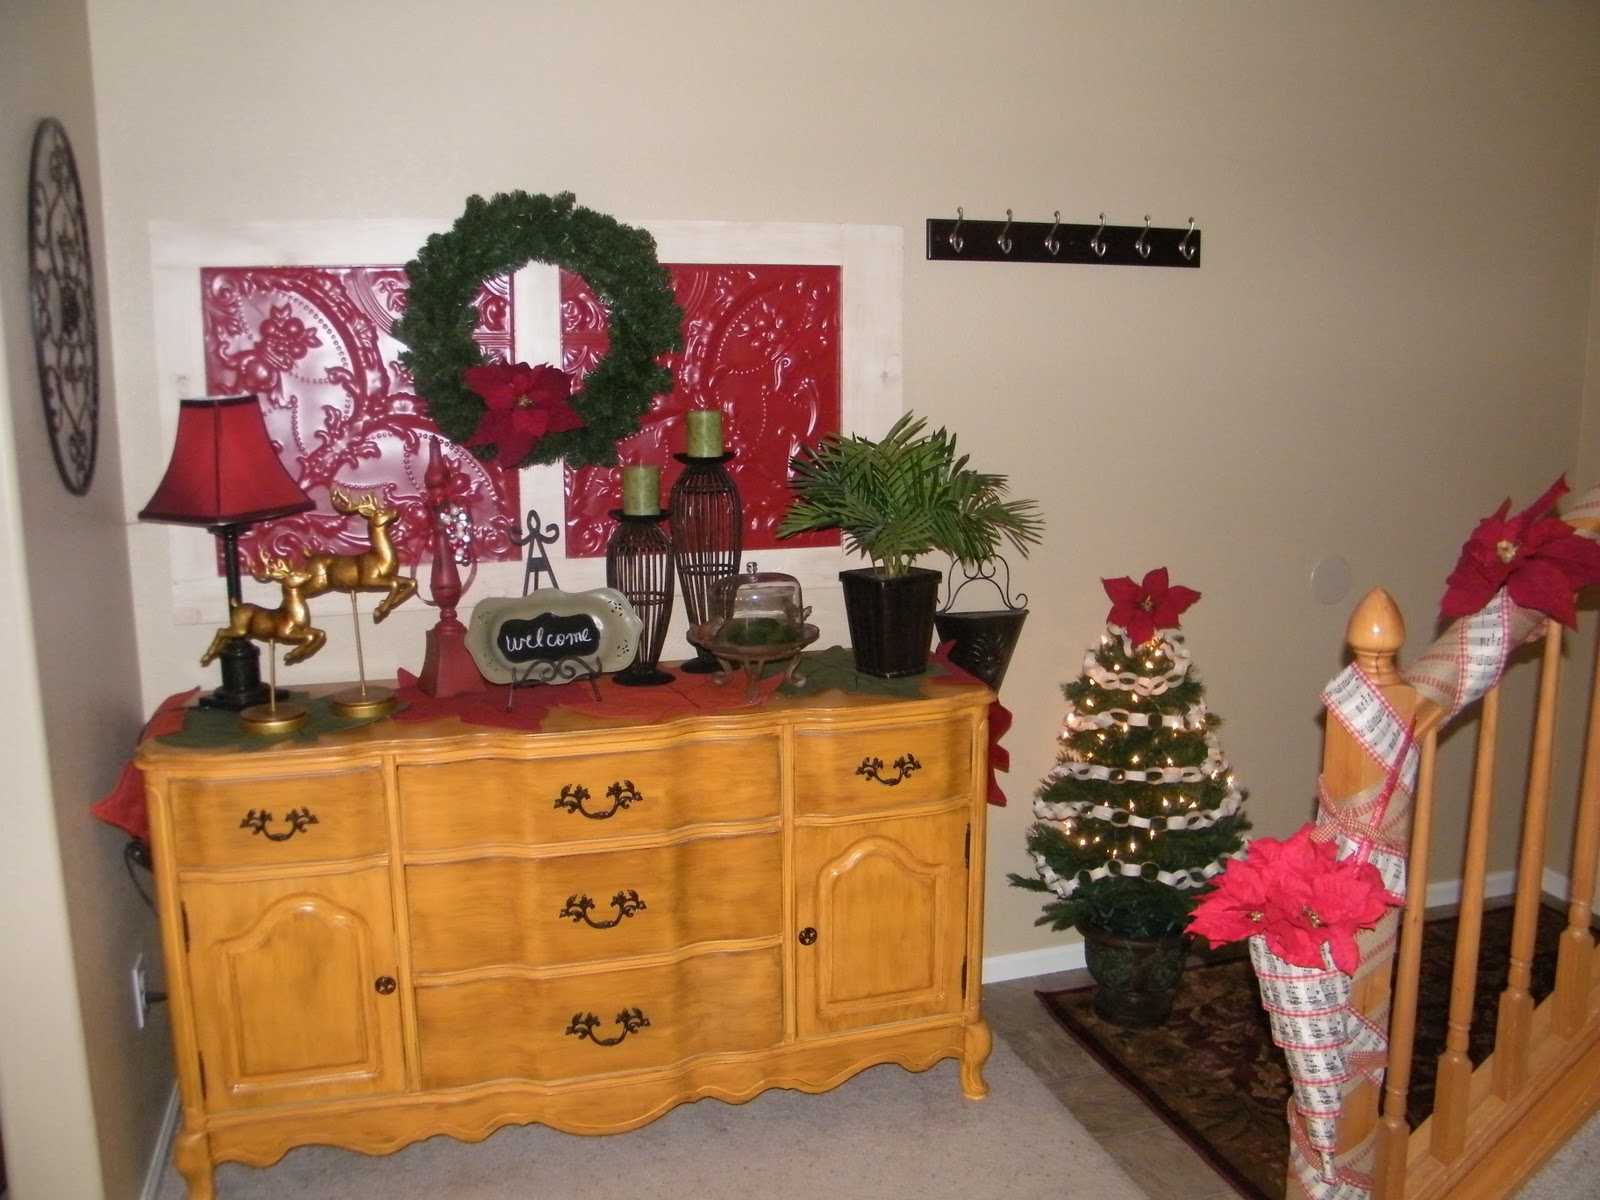
This is my entry way/stair area.  My home is pretty average in size, so no grand entry, but fingers crossed for the next house!  I recently just finished this tin door and hung it over the buffet.  It'll stay here all year long, but lucky me it adds to the Christmas theme, and the door knob on it is the perfect place to hang my wreath.

 Just a little close up of my new deer, I got them at Kohl's and I adore them.

I couldn't figure out the best way to display the cards this year, I'm pretty happy with how this worked out.  One nice thing, you can see them upon entering my home.  Next year I will hunt for a cool shutter, or maybe I'll finding something on another blog.  :)


These great little wreaths where a happy little accident, I was rolling paper cones to make ornaments and discovered after assembling them they where HUGE!  Instead of tossing all the cones I came up with my 'HO HO HO' wreaths, and couldn't be happier.  The down side was rolling a few hundred smaller cones for ornaments.  Live and learn!

Lovely close up.

....and closer yet.  I think you get  the idea.


This year I decided to go simple on the mantel, actually just simple.  In years passed it's looked like a cluttered mess.  Simple = good!  I'm just learning to sew, so the stockings aren't perfect, so don't look to close!  I was going to let the kids decorate them, but then decided NOPE.  They are perfect as is, well to me.


This is my pride and Christmas joy, my Jim Shore nativity.  Love all things Jim Shore.

Here is a glimpse of the tree cones I made and our new stocking holders.  The elf is supposed to help the kids behave, but unless I beat them with him...not going to happen, thankfully he's cute.


The banner reads Merry Christmas, I'll do a few tutorials for all ya'll in the coming weeks, but so easy and cute.  I should add, the little trees where a steal and Joann's, I have two more on the mantel.  I just couldn't pass them up, I was really feeling SIMPLE this year.


A close up for you of the table, again, simple and affordable.  I don't like to spend to much, but I wanted to make sure it was still lovely.  I was going to decoupage these ornaments, and discovered I didn't have the patience, so they are naked in my glass container, and that's all I'm going to say about that.


I love this tree, don't get me wrong, but unless you are a glutton for punishment don't make one!  I really don't know how my kids put up with my crafting, the crying and screaming has to scare them?  256 cones later it did produce this tree and the lamp shade wreath next to it.  We all survived, so it could have been worse.

Love this music  print ribbon, I think I bought 6 or 7 rolls of it...shhh don't tell the hubby.

Another of my lovely Jim Shore creations.  Have I mentioned how much I love him?  Hopefully I will get a new one this year, yes I would like that.


What's that next to Santa?  Oh, my JIM SHORE Santa's Workshop.  I may have to send Jim Shore a fan letter, or at least my first born.  (Momma is kidding Connor, you're safe, for now!)


Last, but not least, the TREE!  Notice the Santa and Reindeer refreshment area, got to make sure he has enough energy to travel the world.

 I made the majority of the ornaments on here, it was fun, but I can't say if I will do a homemade Christmas every year.  I may add to this one, but no starting over from scratch for a while.  Well, maybe...


Cute Hobby Lobby find.  Believe it or not, it's hard to find a topper for a small tree that isn't too "cute".  I also added some gingham garland.  It really makes the tree pop now.


Here's a close up of the garland.  So easy to make, just cut or rip some fabric into stips and tie them together.  

I made some paper wreaths and fans, Santa knows I rolled a ton of cones.  Poinsettias on clips, red felt snowflakes.

Simple frames with music paper.

Scandinavian tart tins.  Berry bunch with ribbon.

Glitter words.


This year I wanted to make Christmas very special for the little people in my live.  Their Daddy, my Mr. Type A is working in Afghanistan until June, so I wanted to spoil them a little extra.   Here is a sneak peak at their little trees and a few of their ornaments.  All store bought, but very cute.  I shopped mostly Kohl's, Hobby Lobby and the Hallmark Store.


This is my daughter Lauren's (Lo) tree, pink for a princess, and she is the resident Diva Princess for sure!   I bought the tree topper from a great shop on etsy theStarcraft.  She also made my son's tree topper and some gorgeous garland for his tree.

Every year I let the kids pick out one Hallmark ornament for their trees.  This year Lo picked out the Little Mermaid.   If you look closely you can see the beady garland I bought her at Kohl's, so cute and colorful, just like my little girl.

Lo is the younger of the two so I let her pick out a few extra ornaments this year, didn't want her tree to be bare.  She loved the circus elephant, so TA DA!


Connor's black tree, yes black, we decided it was the perfect super hero color.  He has been a super hero since he could walk/talk.  We've gone from Spiderman, Batman, Ben10, Ironman to Luke Skywalker.  Right now we love all things Star Wars!  LOVE.

This year he picked out the Ironman ornament, but we ordered the Luke Skywalker one.  The store was out, but never fear, we had one delivered from another store.

This is the gorgeous garland I was talking about earlier from theStarcraft, I told you it was gorgeous!  Full of beads and hand made stars, about 9 feet long!


I hope you enjoyed your glimpse of my very Simple Christmas and hope to see you in blog land.

Have a very Merry Christmas!

Linking up with:


Monday, December 6, 2010

Silhouette Tray

I bought this very plain tray at the local Goodwill.  I knew I was gonna paint it black, but wasn't sure what else I was gonna do to it.  Dilemma...so I head over to The Graphics Fairy for a little inspiration and found this silhouette.  How perfect is she?  I already had the music paper and the mod podge.  I did print her out on yellowed paper, just to age her up a bit and then cut her out. 

Yep, I use her to hold the remotes.  Have you ever seen such a pretty remote holder?

Here's a view of her surroundings.  I haven't named her, I usually only name furniture, but I might make an exception for her.  ;)

Check it out, I'm linking up with The Graphics Fairy today!

Thanks Tammy


More Link Parties:

Sunday, December 5, 2010

Ho Ho Ho Wreaths...

 These wreaths were a happy accident.  I had wanted to make Christmas ornaments using paper cones.  Well, I rolled the cones way to big, and I wasn't gonna just waste them.  I had to find a use for them, and lucky for me I rolled about 200 of the suckers lovely cones...


Here's a close up.  I made three, all the paper in the centers are a little different, but all red, black and cream.  It was my color scheme for this years decorations. 

This is the only place I could think to hang them, they turned out to be about 17 inches across.  This is why they couldn't be used as ornaments.  I attached ribbon with some hot glue, and TA DA they became wreaths!  The ribbon was $2.40 at Joann's, and every thing else I had.  So not a bad price for three wreaths!

Let me tell you, I may have to make different wreaths to hang here year around.  I love using the curtain rod for more than curtains.  Again another happy accident.

Thanks for stopping by. 


Tammy ;)

Tin Door Done!

 Okay, so I have to share my new tin door, really...I HAVE too!  I should start out with I designed and painted it only, my local neighborhood handyman assembled it.  I don't really own the power tools to do it myself, that is right now...the hubby has given permission to start shopping craigslist after the holidays. 


 Here is before picture, I know I should have actually taken pics of the different steps involved in making the door, but I didn't.  Let's face it, none of you are surprised...lol
                                     

Ta Da, the after!  Doesn't it look great?  Thanks.  I got a great deal on the ceiling tin too, and I painted in my new favorite Rustoleum color, Colonial Red.  It's the perfect shade of red.


Okay, so my photography skills are lacking, but here's another angle.  You can't tell from the photos, but I painted the frame Rustoleum Heirloom White and glazed it with Ralph Lauren Tobacco.  I'm crazy about spray paint. 

This door isn't just for Christmas either, this is it's new home, and won't be moving anytime soon.  Not to say it will never move, cause let's face it, I like to change things up.  A LOT!

I had to throw in for fun the new wrapping paper I bought this year.  LOVE it!  Damask, who would have though?  You can get it at....wait for it....HOBBY LOBBY!  Doh, like my fave store!

Close up.  Please excuse the table top in the background.  I'm getting ready to stain it, it's currently living in my kitchen.  I will blog all about it when it's done, so I'm off to stain!

Thanks for checking in with me today!  Happy Holidays.


Tammy  ;)


Friday, December 3, 2010

Linking Up...for the first time....

Hey, I'm linking up with Miss Mustard Seed for the first time...check it out!!!

LinkWithin

Related Posts with Thumbnails