Pages

Tuesday, January 11, 2011

A Horse of a Different Color...

I pretty sure I've said this before, but I'm gonna say it again.  I LOVE ETSY!  Really, it's one of my favorite places to shop, and if I can ever get my "stuff" together, I'm gonna fill my shop....one of these days.  I know, and one of these days I'm gonna remember to take before pictures. 

But what is this?  A before picture?  Okay so I bought this great horse at an equally great Etsy Shop, Carol'sPetPaintings.  Carol and Dave are two of the nicest people to convo with, and they created this horse.

The paint job is gorgeous, looks just like copper with a patina on it.  Let me tell you, I didn't want to paint over it, but alas, I had no choice.  It was clashing with the green in the kitchen, and let's face it I'm not painting the kitchen again.  (well, not any time soon.  never say never.)

See gorgeous.

See clashing?

A couple coats of ORB later, and some sandpaper to distress it.  Ta Da! 

I really heart the green coming through. 

Just what I needed over the window.  Looks amazing. 

The moral of the story is never pass on something because of the paint.  This filly was perfect in every way, she just needed a little adjustment.   Thanks so much to Carol and Dave at Carol'sPetPainting.  They are wonderful to work with, and do very quality work.  I'm one happy customer. 


Tammy =)


Linking with:


Check out the Overstock.com Discount here.

Dining Room Changes, China Hutch Redo and a Frog Potty?

This is what the wall of my dining room looked like in June, then Mr. Type A came home for a brief visit in July and that all changed.  He liked this buffet, and was really pleased with the price.  $55, off craigslist, and it's Thomasville.  I, of course, being the craigslist addict found a different piece I liked much better.  The Hubby agreed, so then work began. 


Again, or like always, I don't have any before pictures of this piece.  I'm really trying to learn from my mistakes....I'll get there.  See the piece in the corner of this picture?  That is what the china hutch looked like when we brought it home.  The two pieces actually go together, but I haven't refinished the smaller of the two.  I may not either, it's not in bad shape, and I don't think I could shove one more green piece in this room.  REALLY. 


This is right after I finished it and we brought it inside to start assembling... mostly Hubby.  I helped with the lifting, he put on all the doors.  (okay, and he painted the inside of the top section...geesh!)


Excuse the mess, I didn't stage this picture.  I'm even surprised I took it.  I must have thought I better, just in case I want to post about it in 6 months. 


Here it is today!  I really love it.  Love the size and shape of her.  It holds everything, and I even have room to add stuff.  Hubby, if you are reading this, yes that is a warning that I may buy more stuff to go inside it.  Just sayin'.


This is Mrs. Miner and Daughter.  This was a Christmas present to myself...you can do that right?  I like the old feel of these prints.


Mr. Miner and Son, yep that's a boy.  Apparently that's how they dressed them 200 plus years ago.  


See, it's not in awful shape.  Should I paint it or leave it?  What do you think?


I'm thinking next week I'm gonna buy a glass top for the table, I'm tired of hiding it under a table cloth.  I really want to show it off more, and not hide it.  (I still haven't refinished the chairs for this table, they are in the garage.)


The entire dining area in all it's glory.


I know you are dying to know about the Frog Potty, so here it is.  My daughter Lauren/Lo is finally wearing big girl panties!!!!  The sad truth, if I hadn't bought this potty, she'd still be in pullups.  She refuses to use the big potty.  I should also point out, she'll be FOUR in May!  She's stubborn.   The potty doesn't live in the dining are either, it just follows her from floor to floor.  Don't want any accidents.


Here's stubborn, watching Tom and Jerry while I take pics and blog.  She wouldn't even look at me, or smile.  STUBBORN! 


Thanks for checking out my changes and china hutch!!! 

Tammy  =)


I'll be linking with:


Check out the Overstock.com Discount here.

Saturday, January 8, 2011

The Seven Deadly Sins

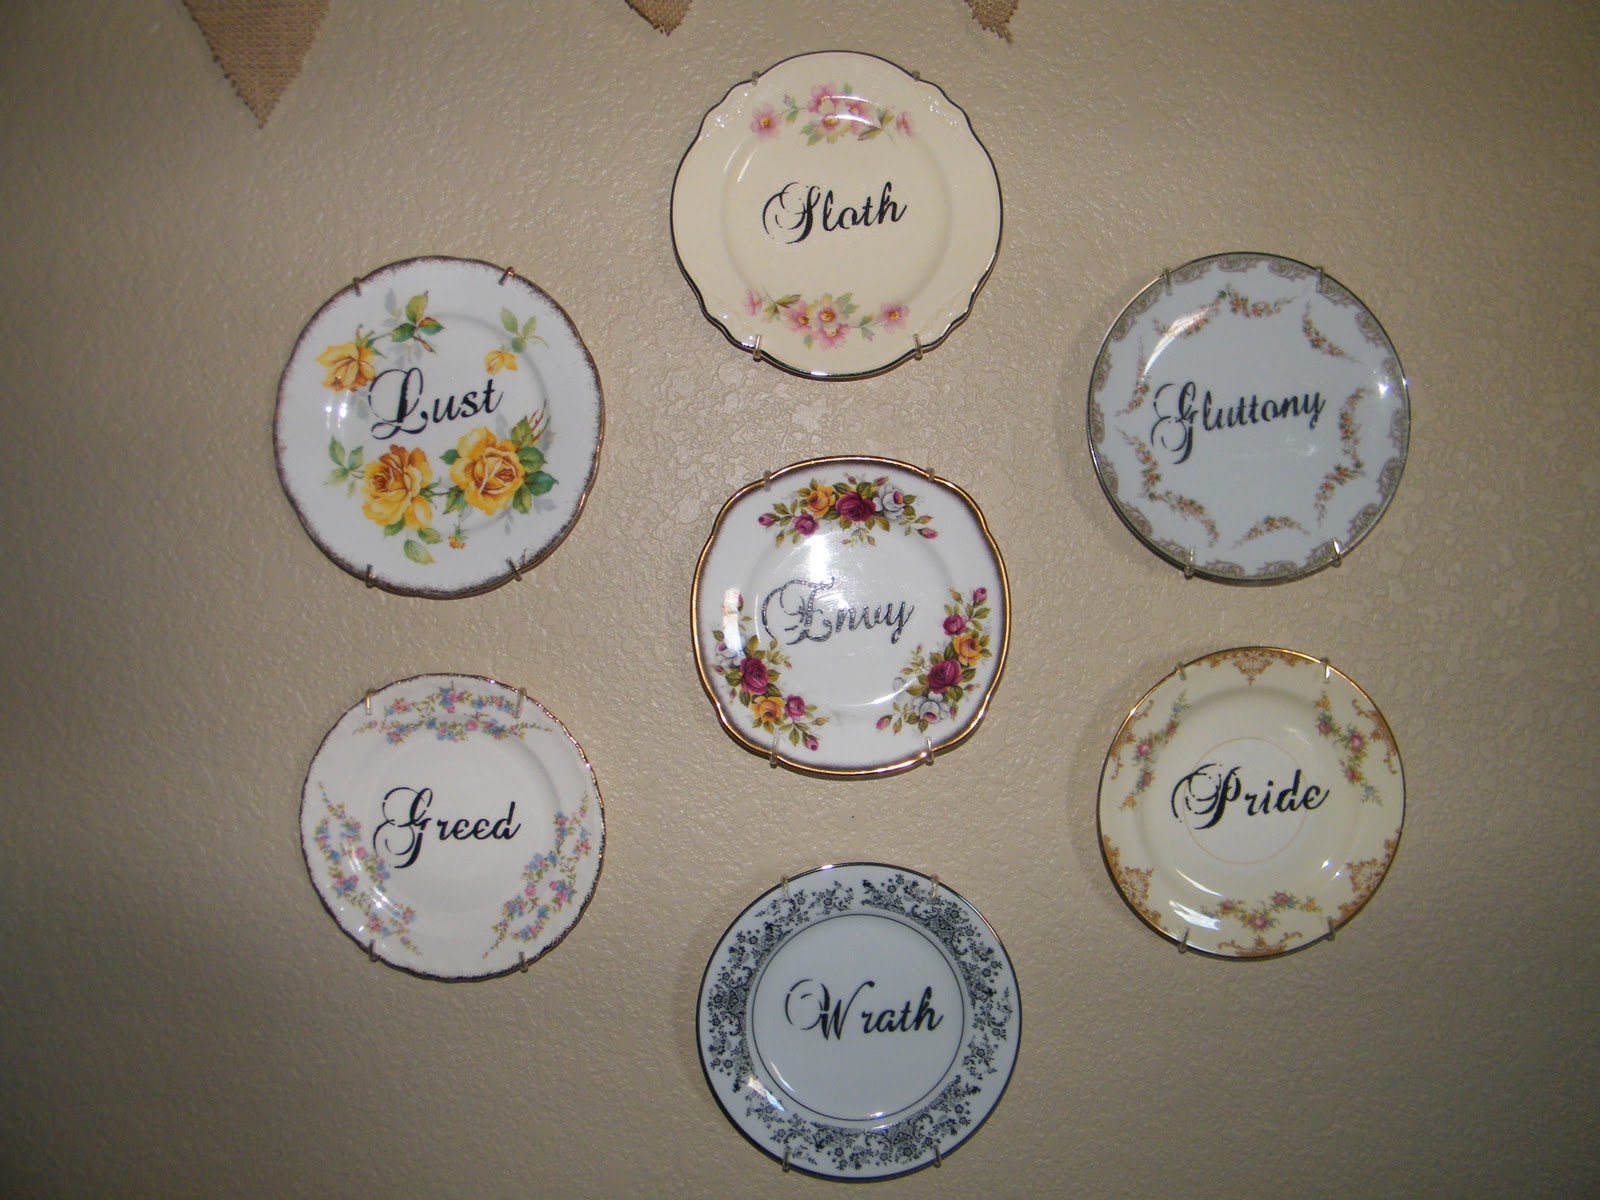
Promise, not here to preach, just to share.   A while back I found this awesome collection of plates with the Seven Deadly Sins stenciled on it, but the price was way out of my comfort zone.   I'm not afraid to admit that I'm cheap.  I'm actually quite proud of it.  lol

The first thing I thought when I saw the plates was 'I can do that'.  Then I had to actually figure out what this would involve.  Where am I gonna find the plates?  Where am I gonna get the stencils?  What kind of paint to do you use on porcelain?  Maybe I should just buy the ones I saw? 

It didn't happen over night, but I eventually answered all of my own questions.  First I hunted up the plates.  Which was actually dang easy.  Replacements Ltd. is the place to go for plates.  The prices range from $-$$$$, so it's whatever you feel like spending.  They package them great, and the shipping was not outrageous.  All seven of my plates delivered cost $55.  I was very happy with the price, and this was on the low end.  None of the plates cost over $10 and the average was $6.50. 

Finished product.

On to where I got the stencils.  I love all things Etsy, and there are some great stencil shops to be found.  I used Red River Stencils and Crafts to create my one of kind copies!  lol  It was super easy, I contacted them to see if they would do a custom order and they did.  I wanted a pretty font, not sure of the name, with lots of detail.  If I had to do this again, I would want less detail, easier to stencil.  They had great customer service and were pretty fast for a custom order.  Took them less than 10 days to get them to me. 

Here are couple close ups.  I love the yellow roses.

The shape of this one is what caught my eye.  Who wouldn't Envy this little plate?  I think the rest of them do.

I bought the stencil paint at Joann's, they have some just for porcelain.  I was happy with how fast it dried, and it doesn't take a lot.  Just a tip, I bought bread and butter plates, you can buy salad or dinner, really whatever size you want.  I wanted them to be smaller, they are around 6.5 inches in diameter.  Here's the tip, if you use a smaller plate cut your stencil down to fit inside the rim (all my stencils were rectangular when I got them), it'll pucker if you don't and you'll have to repaint it...don't ask.  When it was all said and done I saved 50%.  That always makes me happy!

I wold love to see what you create, if you stencil some plates, send me a photo!

Tammy :)

Linking up with:

Tuesday, January 4, 2011

Topiary Trees

First project of the year, and I decide to make topiary trees!  Apparently I didn't get my fill of Christmas Trees?  I've been a little crazy changing all kinds of stuff this year.  I'm not doing any resolutions, but this is going to be the year of change.  So being the cheap thrifty gal I am, I decided I can make these for less!  Yes you can, but wow are they messy, took me almost as long to clean up.


I ended up using spray adhesive to put the moss on, but I bet mod podge would work.  You'll need turpentine to get the glue off your hands.  It's very messy, I sprayed it in the kitchen, but I put down a lot pillow covers that were headed to the garbage.  I used the hot glue to secure the topiary into their pots.  Scissors to cut the burlap and floral wire to attach the wreath.


 Burlap and twine went around the bottom of the pots.  Here's a close up of the wreath I bought and my make shift drop cloths.


Naked topiary, I got these, the pots, moss, wreath and the burlap at Hobby Lobby.


 So I sprayed the orbs like crazy and put the moss on.  I just continued this until the orb was completely covered.  I did spray the finished orbs with more spray adhesive and tried to get all the pieces to lay down nicer, but let's face it they aren't going to be perfect.  The finished project does shed a little if you move 'em around too much. 


I cut a good sized square of burlap so I could cover the pot and used twine to tie it on, then I cut the florist wire and attached the wreath.  I'm very happy with the end result, not bad for my first topiary tree!
 

Here's the second one, a little different than the first.


Like I said this year was about change, I haven't been happy with the buffet by the front door for a while.  This is one of the first changes to take place on it.  More to come...


It's already looking tons better, I think these add a lot of the needed height that was missing.  The candlesticks on the left have been the tallest things on the buffet, other than the lamp, for a long time.  I'm hoping the Eiffel tower makes the cut.  Oh well, I'll just have to move it some where else if it doesn't!!!


Thanks for stopping by!!!

My First Award!

I'm so excited!  I've never won anything before...I'm actually blushing!  lol 

Dani @ Drops in the Bucket gave me this...and it's made my day. Thank you so much!   I'm pretty new to blogging, and being crafty, so to have some one other than my Dad like me this much has put me over the Moon!


To accept this award, it is recommended that you do the following, but I'm not gonna go check on the gals I pass this award on too.  I know, shame on me. 
1.Thank and link back to the blogger who awarded you. (this one is just nice to do.)
2. Share seven things about yourself.
3. Award other fellow bloggers.  (I know I changed this, that's how I roll...lol)
4. Contact these bloggers and let 'em know they won!

Okay, seven things about myself....
1.  I started going gray on top at 17! 
2.  I drink ice coffee, no matter what the temp is like outside.
3.  My favorite time of day is morning.  I love the quiet.
4.  I think I'm super funny.  (lol)
5.  Until December 2009 I didn't own a hot glue gun, and was scared of it when I brought it home.
6.  In the last year I have tripled the amount of furniture in my home.
7.  I'm addicted to craigslist and Goodwill.

Good thing it was only seven....I'm not sure I had eight in me...

Okay on to the good stuff, you have to pay this award forward and here is a group of blogs I just recently started following, and I really love them. 

...drum roll please...


Saturday, January 1, 2011

Craft Hutch

I haven't been in every home in America, but I'm pretty sure my master bedroom is one of the largest, especially when you consider the size of my entire house.  I live in a paired home, fancy term for I'm connected to my neighbors, and it's only 1800 sq. feet.  My bedroom with bathroom is the same size as my living and dining rooms.  Really, not complaining, love the space.  I'm not gonna lie, it would be nice if Connor and Lauren's rooms were bigger.

So what do you do with all this space?  You refinish a ton of furniture and shove it all in!  I did try to 'design' the room, not really sure how successful I was, but I worked really hard and did my very best. 

One of the things I'm not a big fan of in my house, is the amount of storage.  This is were the Craft Hutch comes into play.  I needed something to put my zillions of craft supplies in, no lie zillions.  Ideally my bedroom isn't where I would like to store my crafts, but until the next house with an office/craft room, this is were it'll have to live.  Lucky for me my room is huge.

I know I sound like a broken record, but I don't have any before pictures.  My goal is to be better about this in the future, but in my defense I did this over the summer.  Plus I wasn't even blogging then....any way that's my excuse story, and I'm sticking to it!


Close up of the detail on the top.  Oh so pretty.

Here's a short run down of what I did.  Sanded it down, primed with Rustoleum spray paint and painted it with Rustoleum Heirloom White.  The hardware was spray painted Rustoleum satin black too.  Then I painted the interior of the top section with Valspar satin black.  To finish it all off, I used Ralph Lauren glaze in black and sprayed it with a Rustoleum satin poly.

This is the bottom, before the doors were put back on and the hardware.

Wow, my garage was pretty messy, oh wait...still is...Shh, don't tell Mr. Type A.

I was gonna just leave it on this side of the room, but my gal Angie at All My Treasures, said move it!  (If you stop by and check her out, tell her I sent you, spread the love.)  So I had the hubby move it.  Funny story, he was gonna say I should move it too, but knew I wouldn't listen to him.  He's probably right.

 Ta Da!  In place all finished, and loving it's new home. 

Thanks for stopping by and checking her out.

xx
Tammy :)

Everyday Blessings Winner....

First off, thank you all for entering my first give away.  Second, I promise there will be more, before you know it even!

Without further ado, the winner of the Everyday Blessings Give Away is, Jennifer @ Life, Crafts and Whatever!  Congrats Jennifer!  Please share a picture of what you have made, we would all love to see it.

Now on to some other fun business, another GIVE AWAY!  I told you it would happen before you know it.  I crack myself up...lol

My bestie Sommer over at Designer Garden is giving away this purty Love Pendant, just in time for Valentine's Day.  Donated by yours truly.  Yep, I like to make jewelry and I fire it myself in my own handy dandy kiln.  Which I'm hoping will get an upgrade this year so I can do silver and copper clay.  Okay, so go enter!  I would love for one of my friends here to win!!


Here's a little info about the pendant.

1. It's art silver that I fired in my kiln, final product is 99.9% silver.  More than sterling
2. I hand stamped it with a wax seal prior to being fired, it's roughly 1/2 in diameter.
3. I hand twisted the bail out of sterling silver wire.
4. I hung in on vintage seam binding, cut at 32-33 inches.

Let me know if you have any other questions.  GOOD LUCK!!

I promise the next post will be about something crafty or a piece of furniture!  Pinky Swear.

Tammy :)

LinkWithin

Related Posts with Thumbnails